Photo Editing in GIMP

WendyFish

Members
Based on your feedback so far and my general perceptions, I think one of the needs in the fish photo world is good editing without the arm-and-a-leg cost that Photoshop can carry (depending what features you want).

When I was trying to solve for this, one of the options I looked at was a free program called GIMP (stands for GNU Image Manipulation Program) which is a relatively advanced open source image editing program. Yes, it's FREE.

In conjunction with the workshop, I wanted to think about (and play with) how GIMP could work in a fish photo editing context. So I loaded up a photo that I liked but did some work on. I focused on the type of work that I typically do, which focuses on cropping and smoothing out defects from air bubbles (yes, I should have turned the filter off but he was being cute NOW) and sand on the rocks etc.

Below I'm going to show what I was able to accomplish with the two programs and how they work. Hopefully this will give a sense of the type of editing, and amount of work required, that you can do without spending any money on software.

One of the main assumptions of what I did is that I shortcut the RAW file conversion - I changed my RAW file to JPEG in Bridge because GIMP doesn't have an embedded RAW file editor. (It has an add-on it likes to work with that people like, but I didn't get this in-depth for Proof of Concept purposes. In general, being open source, it has a LOT of add-ons you can mod it with, and in general I did not get into these. What I accomplished with it thus constitutes a baseline and not an expert state.)

The photo I'm going to work on is this one:
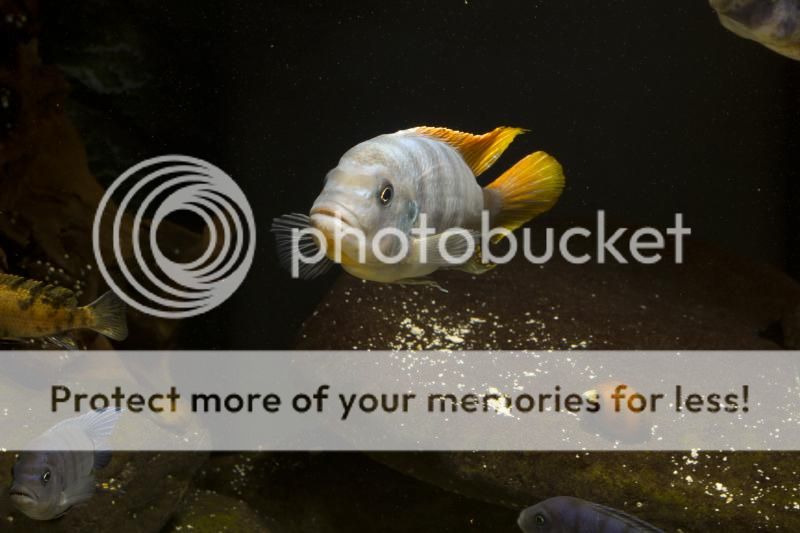

Specs: Shot with my 100mm 2.8 Macro lens, ISO 100, f16, shutter 1/125. Flash above remotely triggered.

It has some things going for it (including featuring my very first cichlid!) but it has some issues. How would you edit this photo?
 

WendyFish

Members
Here is how I would do this in Photoshop.

The first step I would take is to crop the photo. I want to focus on the main in-focus fish and I want him to loom real large, so I'm going to crop it real tightly to him. His dorsal is reflected brightly in this photo so I want to get the top edge in a way that you get the brightness.

Photoshop gives me a nice window to do that. It will show thirds so that it helps me think Rule of Thirds. It lets me (upper left) pick my window size. If I want to print this I can set the size accordingly, otherwise I'll pick an aspect ratio for screen.


Once I hit the check box it's going to hone in on my selection, and I get this:

http://s7.photobucket.com/user/wzrk/media/PS2_zps4ecdbf52.jpg.html


Now what I don't like is all the spots and details distracting me from the fish. There are a variety of ways I can deal with this in Photoshop but there are two really convenient ones.

For small editing, I can use the healing brush to touch things up. Photoshop CS5 and newer have an innovation called "Content Aware" that reads the surrounding area of the image and tries to interpret the context to guess at what it should use to fill. The algorithm is excellent, in my experience. The image I have shown below uses the healing brush to clean up areas of sand on the rocks that would otherwise draw the viewer's eye. The healing brush is represented below by the black trail in the bottom right corner. When I release the mouse button from making that trail, Photoshop is going to try to figure out what I meant to put there, and it's going to figure I wanted to put rock of similar color and texture to what is nearby the part covered by sand.

http://s7.photobucket.com/user/wzrk/media/PS2_zps4ecdbf52.jpg.html


Now, the other way I can edit in Photoshop is at the bulk level. CS5 has a smart selection utility. Historically, selections worked either through rectangles or more complex user drawn paths of various types. In CS5, there is a selection tool that has an algorithm that looks for related elements and groups them in your selection as you drag the mouse. Then you can do whatever you want with the associated selection. I have shown this below for illustration on a big blank area.


Now... this wouldn't work great. It's more illustrative. Why not? Well, if I auto fill this, I have two choices. I can use the Content Aware option, which like the healing brush approach above is going to take its best guess contextually at what it should fill with. In many cases, that works fine - I have a vacation photo that I did this on, and it cropped a dude taking a photo into the underbrush. Way cool. But here, I can tell you what it does it make a mishmash of black background and dorsal fin that doesn't make any sense. I could also fill it with something else of my choice, and here I might choose black. It turns out that the flash-darkened background of this photo is not pure black, it is a much more prismatic thing, and if you ever again doubt whether a perfect flash backed photo is genuine, I promise you can tell because the edges are funky and the purity of the blackness is all wrong.

So in fact the best approach is to take the healing brush to the water/air spots on the black background as well. You don't have to use a tiny brush size, it is somewhat coarse and low on nuance.

The end state photo I came up with in Photoshop is this:

 
Last edited:

WendyFish

Members
Okay, now let's talk about GIMP.

I have a relatively similar looking UI as I did in Photoshop:


As before, the first thing I'm going to do is crop, so I'll rectangular select my image:


Then crop my selection...


Now, as before I have a photo with a good fish in good focus but some optical imperfections/distractions.


In base, unmodded GIMP, there is also a Heal tool. Full disclosure, I have not investigated whether there is an add-on tool with any different or additional functionality - always a possibility in open source.

The Heal tool in GIMP works like the Clone Stamp tool in Photoshop - you designate a static "copy from" area and where you click becomes the "copy to" area.

For example:

X O
X O
X O

Whatever pixels are in X will copy to O when I hold the mouse button down. As I move my mouse and click, therefore moving O, my point of reference X will move with it. At least, that is the way that Clone Stamp works in Photoshop. I experimented with this in GIMP and could not 100% assure myself of the behavior. It seems to be a little fussy, subject to boundaries, and maybe some latency if you are like me and move around real fast. A surface examination of this didn't totally determine its behavior. It was also relatively painstaking because you have to find a clean area for all the spots.

In the image below, I cleaned up a lot of the dark background. It works really great on air or water spots on the background because there is a lot of uniform area in the photo we can sample from. I ran into trouble on the rocks. I would have expected that in a clone stamp type mode, because there are contours of the lighting, for example, that clone stamp isn't going to get right depending where you're reading from. Content Aware in Photoshop will do a pretty good job at that, but doing it manually through cloning is darned hard. Even given that, it did not work as I expected and I ended up smudging the sand around - this may well be user error, as I just started messing with this, but it's certainly less intuitive.


WendyFish

Members
I can and will demonstrate this stuff on Sat but thought I'd share the tutorial for those interested who may not be able to attend.
 
Last edited:

mchambers

Former CCA member
Very cool. I've installed GIMP, but never got around to figuring out how to use it effectively. This is great.
 

spazmattik

Members
I may be getting programs mixed up but if I remember correctly I installed gimp as an image resizer at one point. Looks like there is a lot more to it than that now if I am thinking of the same program. Anywho, cool stuff :) looking forward to tomorrow
 

Tony

Alligator Snapping Turtle/Past Pres
Very cool, Wendy. Thanks for posting that up.

Another good free program is Paint.net. That's what I use.
 

Spine

Members
Thanks for breaking things down for us. It seem like each photo editing software has something that's different or easier to use than others. I also use YouTube video's and blogs to help learn this stuff.

I seem to learn the best by just playing around with it and learning from mistakes:mad:. Its not a bad idea to download any free/trail editing software and playing with it until you find one that comfortable for you.
I try and get the picture right when I shot it and then there's not a lot needed in editing.

Photoshop CS2 is available for free now and has many of the features that are in the current versions. Just download the program and google the serial number.
http://www.techspot.com/downloads/3689-adobe-photoshop-cs2.html

http://en.softonic.com/s/adobe-photoshop-cs2-free-download-full-version/windows-xp

https://www.adobe.com/cfusion/entitlement/index.cfm?e=cs2_downloads
 

AquaStudent

CCA Members
I've poked around with GIMP a bit and it works well but not nearly as powerful as the expensive Photoshop. But you can't beat Free.99!

For GIMP on the sand spots there is a blemish repair tool that can work. Blend also works well especially combined with the 'color select tool' and manually patching in some of the very off colors. The blend will then smooth between colors that are more natural for the rock.

It also works well with out of focus plant background.
 

HoleyRockofTex

CCA Members
I would love to learn how to use these programs better. I think we should have a meeting / workshop on it. It seems like there was one a while ago.
 
Top